Batteries die. Cell phones lose connectivity. Even satellite service can be unpredictable. But a map and compass? You can always count on these two “old schools” tools to discover where you are and how to get to where you’re going.
Truth is, navigating with a tried and true map and compass is an essential outdoor skill. Real explorers don’t ask Apple Maps or Google Maps for directions!
In this post, I bring you up to speed on the basics of using a map and compass in the backcountry. Here’s what you need to know:
Start with a Detailed Topographical Map
The first step is to obtain a map. If all you’re planning to do is hike well-established paths in a park, a basic trail map is all you really need. However, when you’re traveling off-road and off-path, you should have a topographical map. A topographic map shows the physical features of the land, especially its shape and elevation, as shown below.
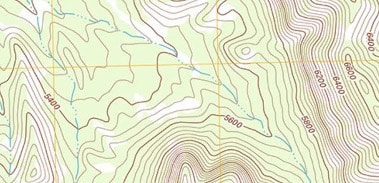
A topographical map is one of the most useful tools for wilderness navigation because it helps you visualize the terrain before you ever set foot on it.
Free Topo Maps: If you’re traveling in the United States, the U.S. Geological Survey offers free topographical maps you can download to print at US Topo. Another option is to purchase a gazetteer (a geographical “directory”) for each state in which you’re planning to travel.
Once you have your map and before you begin your backcountry or wilderness expedition, open it and familiarize yourself with its features:
- Contour lines show the elevation and shape of the land. Each line connects points of equal elevation. The closer the lines are, the steeper the slope; the farther apart the lines are, the gentler the slope. Every fifth line is a darker index line, which is usually labeled with the elevation in feet. Small circles indicate a peak or a valley.
- Compass rose shows directions: A compass rose is a design on maps and charts that indicates directions (north, south, east, west, and intermediate directions).
- Scale shows how distance on the map translates to real-world distance. Common scales include 1:24,000 (1 inch on the map = 2,000 feet on the ground) and 1:50,000 (1 millimeter on the map = 50 meters on the ground).
- Legend (key) describes map symbols and colors, typically identifying features such as trails, roads, campsites, and bodies of water.
- Grid consists of vertical and horizontal lines indicating longitude and latitude. These lines come in handy for orienting your compass with the map, as explained later in this post.
Take some time to understand your map. Find the legend (key), compass rose, landmarks, features, scale, and gridlines. Look for specific landmarks and features you’re likely to recognize.
Next, let’s focus on your compass.
Exploring Your Compass
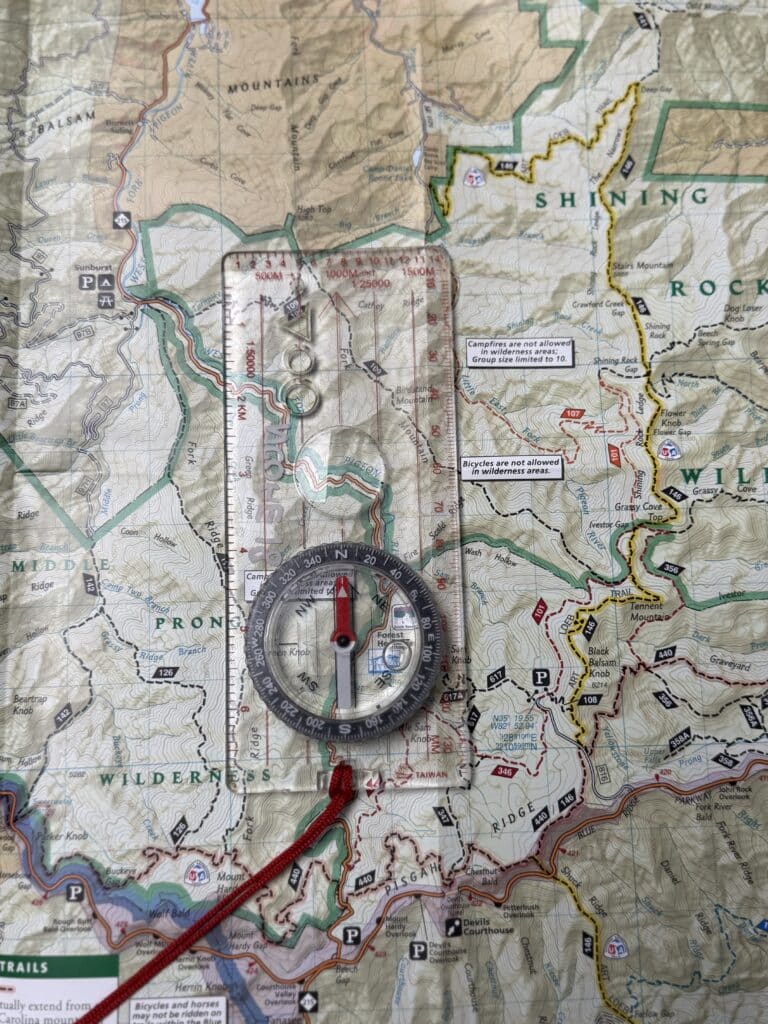
Before you try using a compass, it’s best to understand its parts:

- Base plate: The base plate is the hard, flat surface that makes up the body of the compass. The compass housing is mounted on top of the base plate. When using your compass, the base plate should be horizontal — flat on your outstretched palm or flat on your map that’s resting on a horizontal surface.
- Dial (bezel): The dial (bezel) is a rotating ring that has markings from 0 to 360 on the outer edges, indicating the number of degrees in a circle (if you were to turn around completely).
- Direction of travel arrow: This arrow is located on the front of the base plate. The direction of travel arrow should always point in the direction you want to travel after setting your bearing (something I explain how to do later in this post).
- Orienting arrow: Located on the base of the compass dial, it often looks like the outline of an arrow or an arrow shaped box. When you turn the dial, it rotates as well. You use this arrow to orient your compass with a map and set your bearing.
- Magnetic needle: The magnetic needle is a magnetized strip of metal that floats inside the housing so it can rotate freely. The red end of the arrow always points to magnetic north, and the opposite end always points south.
- Index line: Typically located just above the dial, the index line is used to set and read your bearing. The index line aligns with the direction of travel arrow.
- Orienting lines: Orienting lines are the parallel lines in the compass housing, behind the magnetic needle. You can line up these lines with the north-south grid lines on your map. The orienting lines move when you turn the dial.
- Rulers: Rulers located on the edges of the base plate. You can use the ruler along with the scale on the map to estimate distances.
Orienting Your Map
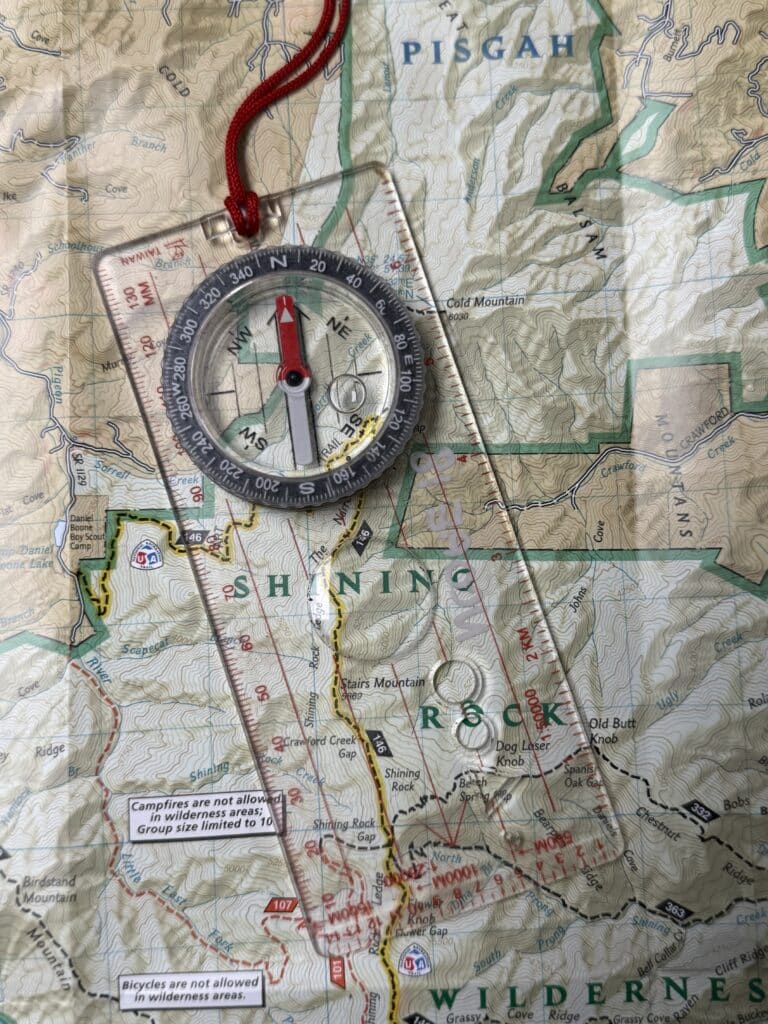
When you’re navigating with a map, you want to be sure that you’re holding it so that north on the map aligns with north in the real world. To accomplish this, take the following steps:
- Lay your map out flat or hold it horizontally to the ground.
- Place your compass on top of the map with the direction of travel arrow aiming toward the north side of your map.
- Rotate the dial, if necessary, until N (north) is in line with your direction of travel arrow.
- Slide the baseplate until one of its straight edges aligns with either the left or right edge of your map. (The direction of travel arrow should still be pointing north, toward the top of the map).
- While holding the map and compass together, parallel to the ground, rotate both until the red end of the magnetic needle (Red Fred) is inside the outline of the orienting arrow (the Shed). Yes, put Red Fred in the Shed!
North on your map is now pointing to north in the real world.
Taking a Bearing
“Taking a bearing” involves finding the direction you need to travel to get from point A to point B. A bearing is measured in degrees from the reference line of 0 (zero) or 360 degrees, which is north.
To take a bearing using your map and compass, perform the following steps:
- Position the map so north is at the top.
- Place the compass on the map, aligning the edge of the compass with your current location and desired destination. You can even draw a line on the map, along the edge of the compass, to connect the two points.
3. Rotate the bezel so that the orienting lines are parallel to the orienting lines on the map and the orienting arrow is pointing north on the map.
4. The index line shows your bearing — the angle, measured in degrees from north (0 or 360), that you need to travel from your current location to reach your destination.

Heading Along Your Bearing
After taking your bearing, you’re ready to head in that direction. Take the following steps:
- Hold the compass out from your body, about waist high, parallel to the ground, so the direction of travel arrow is straight out from your body. Assuming your map is properly oriented to your compass, you can hold the compass and map together to get a better sense of where you’re going.
- Slowly rotate your body, keeping the compass level, until the magnetic needle (Red Fred) is inside of the orienting arrow (the Shed).
- Stop.
- The direction of travel arrow is now pointing toward your destination.
- Find a reference point in the distance that your direction of travel arrow is pointing to and walk to it.
- When you reach that reference point, repeat Steps 1–3 to stay on course.
Congratulations, you now know the basics of navigating in the wilderness using a compass and map. Before navigating unfamiliar terrain, I encourage you to practice in areas with which you’re familiar to hone your skills and build confidence.
Also, if you’re planning to trek across long distances (more than a couple of miles), you’ll need to know how to correct for declination — the number of degrees difference between magnetic north (where your compass needle points) and true north (as marked on your map). In the U.S., this difference can range from 20 degrees west to 20 degrees east and can make a tremendous difference of where you end up when traveling a long distance. But let’s save that topic for a future post.
= = = = = = = = =
About the Author: Elizabeth Shirley, WFR, is the Director of Outdoor Education at The National Center for Outdoor & Adventure Education (NCOAE).
TALK TO US
Have any further questions about our courses, what you’ll learn, or what else to expect? Contact us, we’re here to help!
Leave a comment