“Did you ever consider thinking like farmers think,” asked my wife, Christine, over breakfast the other morning. And by “you,” she meant guides, outdoor/adventure educators and those folks who love to explore the outdoors.
I answered her question with a shoulder shrug and a grunt, which meant I didn’t understand the query.
So Christine patiently explained. “When you see a farm in the winter it may look as if nothing’s happening. The fields look bare and quiet. Tractors and trucks aren’t out in the fields working. However, the farm still has work to do. The job of the farmer is to repair equipment, sharpen tools as well as skills and to make sure that come the first day of planting everything is powered up, runs well and doesn’t get in the way of important work getting done.”
“Oh, I get it! We shouldn’t just box up our gear in the off season and forget about it until we want to go on a trip or work. We should be spending the “off season” repairing, understanding and building our skills so nothing gets in the way of fun and important work.”
She has a good point.
So let’s look at some of the skills we can work on enhancing during those days when we can’t get out. The benefit of working on these skills is becoming a better outdoors person by being prepared to deal with issues in the backcountry. And doing this with friends and family creates the feeling you are in the backcountry if you use your imagination.
Let’s start with some technical skills that can have a great impact on “basic needs” during a backcountry trip. For this blog post I will focus on following three because they affect food, water and shelter… that’s right, our basic needs!
- Water Purification (choices)
- Backcountry Stoves (selection/repair)
- Shelter (selection/repair)
1. Water purification
No matter where you travel in the backcountry, you’re going to want to know how to purify your water. How you decide to create safe water is up to you, who you’re traveling with and the needs of the group.
For purification, it comes down to removal of viruses, bacteria, protozoa and dirt. And there are a several approaches to doing this, including:
Boiling: Boiling may be the easiest way to purify water. In order to do this you need heat. If your camp stove is working, fire it up. If you don’t have a stove — or it’s broken — you’re going to need to build a fire for your heat. Once your heat source is on, bring the water to a rolling boil for five minutes, when it’s then safe to drink. Let the water cool before drinking or you will scald you lips or suffer burns, and that’s no laughing matter in the backcountry.
Filtration or purification pumps: Quick and dirty. Pumps take in nonpotable (nasty) water through one end and spit out potable (drinkable) water on the other end. To accomplish this, you can use:
Pump filters — These are very common, and what people usually think of first when they think of water treatment. These devices cleanse water by pumping it through a filter that has a pore size that is too small for bacteria and protozoa to move through it. Example: Katadyn Hiker Pro.
Gravity filters —These products cleanse water by using gravity to push it through a filter, eliminating time-consuming pumping. Example: MSR AutoFlow Gravity Filter
Filter Straws — These models treat water as you drink directly through a big straw, which doubles as a hollow fiber filter. Example: LifeStraw.
Note: There are hi-tech water bottles that have an all-in-one feature, filtration/purification built into them, so there’s no need to pump water into a separate bottle. The purification process happens as you squeeze or suck water directly into your mouth.
Chemical Treatment: A simple and inexpensive — but not necessarily the best tasting — method of purifying wild water is by dropping in a couple of purification tablets or drops. The most common chemical used is iodine, but chlorine or potassium permanganate is also effective. Let the chemicals treat the water (read manufacturer’s instruction for treatment duration) before consuming.
Tip: Mix in flavored powder drink to mask taste.
Survival techniques: Survival skills, and the techniques to pull them off, require very little equipment and that’s a plus. The downside is that they are “survival” skills. We want to thrive in the backcountry, not just survive. The following are great skills to know and practice in base camp or at home, but don’t rely on these skills for all your needs. Unless all your needs are to survive:
Solar Still/Well — According to NatureSkills.com, you can pull moisture out of the earth by digging a hole in the ground and inserting a container on the bottom. Cover the hole with plastic so that no moisture escapes, and put a small weight (maybe a stone?) in the center of the cover so that there’s a dip in the center. When the water evaporates from the ground upwards, it condenses on the cover and drips down into the container.
 2. Backpacking Stoves
Everybody who enjoys the outdoors has a bit of a gear fetish and pretty strong opinions on what is the “best” piece of gear for any given task. Choosing a backpacking stove that is small, portable in a backpack, efficient and versatile, can get some of us pretty riled up — and believe me when I say I have seen it happen. Here’s my two cents worth:
Select a stove that you are comfortable using — one that meets the needs of group size, location, etc., — and know exactly how to maintain it. I have used all of the following types of stoves for personal and professional purposes:
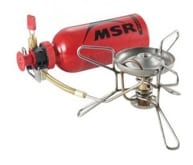
Liquid Fuel Stoves — Generally speaking, liquid fuel stoves are used for longer expedition style trips for a group size of two or more. These stoves intimidate some because they take some knowledge to correctly operate. They have many parts and often need to be primed properly before use. You can take them completely apart, clean and trouble shoot them easily, and then put them back together, all while out in the field. I have been on trips that went from disaster to delightful because of the versatility of these stoves.
Examples: MSR WhisperLite International, MSR Original/Universal, MSR Dragonfly, Optimus Nova+.
Video recommendation: How to repair a liquid fuel stove
 Small Canister Stoves — These stove are compact units that are super easy to use and very lightweight. Many people are attracted to small canister stoves because of their lightweight nature. They are easy to pack and could even be taken as a spare.
These stoves tend to be less fuel-efficient than an integrated canister stove because they have no wind resistance. However they are slightly more versatile because you can use different cookware on the burners and there is more temperature control and simmering capability. They also don’t have adjustability and stability of a liquid fuel stove. These are great for solo trips or with one other person.
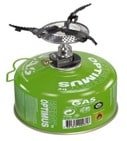
 Integrated Canister Stoves — A newcomer and popular choice on the stove scene, these stoves combine a burner and a heat-exchange pot for greater efficiency. Jetboil started the craze but other manufacturers are stepping up to the plate with their own designs. These stoves are magic for boiling water but don’t offer flexibility outside of boiled meals, freeze dried foods or pastas. These are a great choice for solos trips. Like the canister stoves, they can be tippy on uneven ground.
Video recommendation: How to repair an Integrated Canister Stove
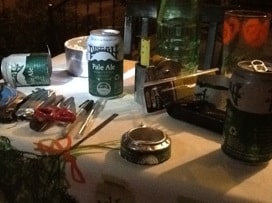
Alcohol stoves — People who are attracted to these stoves are looking for lightweight, ease and the flexibility of getting fuel and even funkiness (like me).
Alcohol stoves burn denatured alcohol and are best used only for boiling water to make dehydrated or freeze dried meals. Fuel is easy to find because denatured alcohol is inexpensive and available in any small town, even if there isn’t an outdoor store. There is no flame control on these stoves, and they can sometimes be tricky — especially in the cold or at altitude.
I make my own alcohol stoves and have used them in all kinds of conditions. If you are in a hurry to cook or with a group of more than two, this is probably not a great choice. During the off-season, they are fun to build and try to improve upon. There is really no repairing an alcohol stove. Drink two more cans of your beverage of choice and rebuild.

3. Shelters
One of the first variables that can make or break a backcountry trip is how well you sleep. If you don’t sleep, all decision-making capabilities go downhill quickly. Make sure you choose a shelter that best suits your needs. Today we will look at three types of shelter:
Tents — There are two major types of shelters, single and double wall. Single walls are lighter and use heavy waterproofing on the fabric for protection. Drawbacks are less room for protected gear storage and they tend to get more condensation. Double wall tents feature a material inside and a separate rainfly for added protection from the elements. Double wall offer more gear storage, area but are heavier.
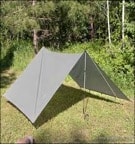 Tarps — If you want to go light and you don’t mind exposure to weather, and you know how to be resourceful and tie proper knots in the dark, a tarp may be the way to go. If you want you can go to a dollar store and get a blue, green or camo tarp to sleep under. They are also inexpensive ($5-20 dollars). Dollar store tarps are also heavy.
Your other tarp option is one made specifically for camping. They are usually made from Rip-Stop nylon with all seams are sealed and taped, with reinforced webbing tabs. They weigh about a thousand grams (2.2lbs.) and cost from $60 to $200 and more. But they last much longer and afford much more protection.
Here is one way to set up a tarp. Not an easy way but one you should know if there are no trees in your site.
Video recommendation: Tarp set up
Bivy Bags — If you want to go solo, feel the breeze, look up at the stars and watch the sunrise, then you should go bivy! Short for bivouac sack, a bivy bag, in my opinion, provides the wildest feeling of all shelters. It’s essentially a waterproof jacket for your sleeping bag. Bivys tend to be less expensive than a tent but more expensive than a tarp.
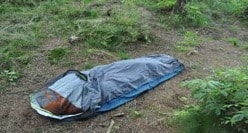
Using one requires being comfortable in a cocoon-style environment. Also, you need to be careful to allow for airflow or you can get a lot of condensation.
Recommended tent, tarp and bivy repair links: Tent care and repair and Make your gear last forever
All this information should give you a head start on your backcountry preparation plans. It’s not all that definitive, but again, it’s a start. If nothing else, it should remind you that an inventory of your equipment and its condition is a must for future camping expeditions.
Take the down time that you have right now and unpack your gear, explore new options and sharpen your skills. Doing so will save you money and allow for better trips that result in pushing yourself deeper into exploration. All it takes is to follow “the way of the farmer.”
– – – – – – –
 About the Author: Stephen Mullaney is the staff development director at The National Center for Outdoor & Adventure Education (NCOAE) in Wilmington, N.C., where he is responsible for the training and education of NCOAE’s field instructors. He is a member of the North Carolina Association of Educators (NCAE) and has taught within the Durham, N.C., public school system. Stephen received his undergraduate degree in English from Framingham State University, and an Independent, alternative Masters in Education.
TALK TO US
Have any further questions about our courses, what you’ll learn, or what else to expect? Contact us, we’re here to help!
Leave a comment