

Properly operating an oxygen cylinder is among the first hands-on skills every EMT student learns in training. On the surface, it looks simple enough: Just attach the regulator, open the valve, and boom! You’re good to go.
But the apparent simplicity of the operation can be deceiving. For instance:
- A damaged O-ring can cause a leak.
- An unsecured cylinder can become a dangerous projectile.
- Failing to check tank pressure can leave you without oxygen just when your patient needs it most.
Whether you’re a medic in an ambulance or providing care in the backcountry, knowing how to safely set up and operate an oxygen cylinder is a foundational emergency medicine skill. This post brings you up to speed on the fundamentals of administering oxygen.
Oxygen Is Medication: While oxygen may be readily available, that doesn’t mean every patient needs it. It’s a medication that should be administered only when clinically indicated and according to current protocols and each patient’s needs. Before any of that can happen, however, you need to get the oxygen safely from the cylinder to the patient.
When Administering Oxygen, Safety Comes First
All of us learned in middle school science that oxygen makes fire burn faster, so whenever you’re working around concentrated oxygen, take the following precautions:
- Never smoke near oxygen.
- Don’t use spark-producing electric tools, hair dryers, curling irons, or electric razors.
- Don’t use petroleum jelly-based lubricants like Vaseline on your skin. When you mix grease or oil with pure oxygen, any small spark can cause a dangerous fire on the skin. Use water-based lotions or lubricants instead.
- Never use oil or grease on the regulator or tank fittings, and do not handle equipment with greasy hands.
- Always secure oxygen tanks to prevent them from tipping or rolling.
- Keep tanks at least eight (8) feet away from open flames, gas stoves, candles, fireplaces, heaters, and campfires.
- Store tanks in open, well-ventilated areas. Never put them in a closed closet, trunk, or under bedding.
- Never drop a cylinder.
Getting Oxygen Flowing: Step by Step
Developing a consistent routine makes oxygen setup faster and reduces the chances of overlooking something important. That’s why we have a standard eight-step operating procedure for administering oxygen to a patient (below).
These steps assume you have plenty of oxygen, but that’s an assumption you should never make. Be certain that the oxygen tanks you have available to treat patients are sufficiently full. A full tank is typically 2,000 pounds per square inch (psi). Partial tanks should be replaced at about 500 psi. Later in this post, you’ll learn how to check tank pressure.
Step 1. Secure the cylinder
Never use a free-standing cylinder. Place it in a holder or lay it flat if it’s not attached to a cot. Otherwise, you run the risk of the cylinder getting knocked over and breaking the stem or dislodging the regulator. Worst case scenario: the stem cracks or breaks turning the tank into a dangerous missile that doesn’t stop until all the compressed air inside escapes.
Never leave an oxygen cylinder standing upright unsecured or rolling around on the ground.
Securing the cylinder is particularly important in wilderness and backcountry settings, where uneven terrain can make freestanding tanks tip or roll more easily.
Step 2. Inspect the cylinder and regulator
Before connecting anything to the tank, take a few seconds to check your equipment. Look for the following:
- Physical damage to the cylinder or stem.
- Dirt or contamination around the valve.
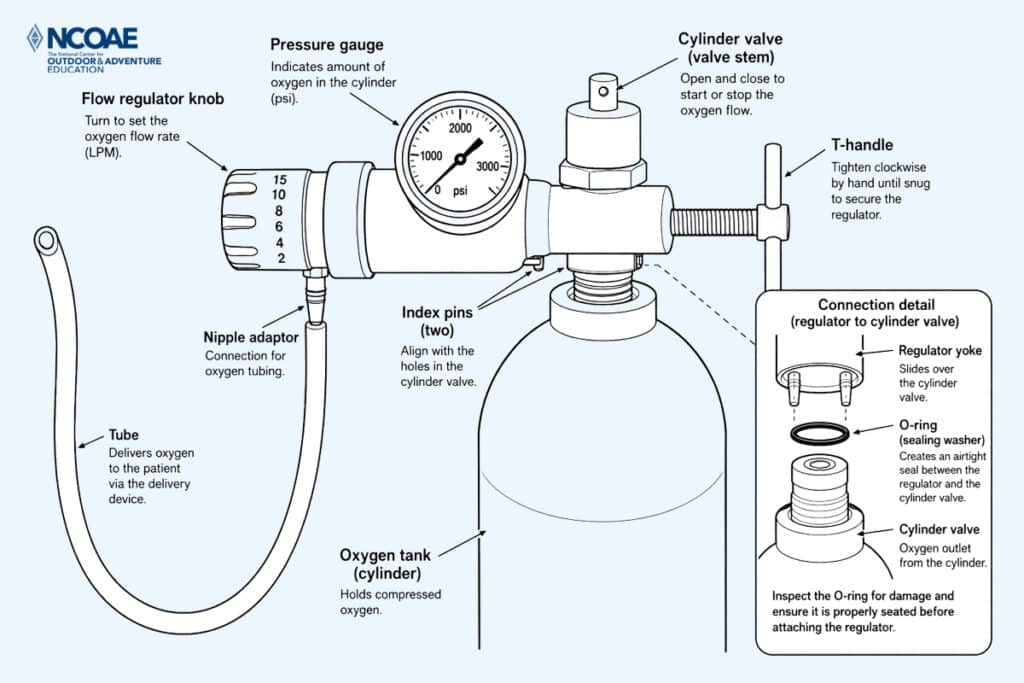
- A properly seated, undamaged O-ring on the regulator. That little O-ring requires special attention. Without a good seal, you’ll likely lose oxygen around the regulator instead of sending it to your patient.
Pro Tip: Slow is smooth, and smooth is fast. Taking an extra five seconds to inspect and properly mount a regulator can save valuable time, and prevent equipment failure, when every second counts.
Step 3. Remove the plastic collar from the stem
New tanks have a plastic collar around the stem that must be removed before attaching the regulator. Be sure to remove the collar before proceeding to the next step.
Step 4. Crack the valve
Point the valve away from yourself and everyone else nearby, briefly open the valve, and then close it.
Briefly opening the valve is an important step because it blows away dust or debris which could prevent the regulator from making a clean seal. Skipping this small step can result in a leak and force you to troubleshoot the equipment while your patient waits for oxygen.
Step 5. Attach the regulator
Slide the regulator over the stem, aligning the pins on the regulator with the holes on the stem, and then tighten the T-handle hand-tight.
Don’t try to muscle it into place. If you’re struggling with the regulator, stop and check the alignment.
Step 6. Open the cylinder valve
Slowly open the cylinder valve at the top of the stem. As you open the valve:
- Watch the pressure gauge
- Listen carefully for leaking oxygen
If you hear hissing where the regulator meets the cylinder, stop and check the connection and O-ring.
Opening the valve slowly gives you a chance to identify a problem before moving on.
Step 7. Check the tank pressure
A full cylinder is about 2,000 psi, although the exact pressure may vary slightly. Cylinders approaching low pressure (usually 500 psi or less) should typically be replaced.
Don’t wait until you’re treating a patient to discover that your “full” cylinder is nearly empty. Most organizations have their own requirements for replacing cylinders, but like we said, tanks approaching 500 psi or less generally need to be replaced.
In a wilderness setting, knowing your oxygen supply becomes even more important. Your patient may be hours from definitive care, so oxygen availability needs to be considered along with the expected duration of treatment and evacuation.
Step 8. Connect the delivery device and set the flow rate
When the cylinder is operating property, connect the tubing and the appropriate delivery device and set the flow rate according to your protocols and the patient’s needs. Common examples include the following:
- Nasal cannula: 2 to 6 liters per minute (LPM)
- Nonrebreather mask: 10 to 15 LPM
- Bag-valve mask (BVM) with oxygen reservoir: 12 to 15 LPM (some regulators allow for 25 LPM)
Keep in mind that these are examples. Follow your organization’s current protocols and adjust oxygen delivery to the patient’s clinical needs.
Pressure and flow are not the same thing. The pressure gauge tells you how much oxygen remains in the cylinder. The flowmeter or flow knob tells you how much oxygen is going to the patient. Think of one as a fuel gauge and the other as your throttle. A cylinder may contain plenty of oxygen, but you still need to set the appropriate delivery (flow) rate.
Avoiding Common Mistakes when Administering Oxygen
Even a straightforward procedure leaves plenty of opportunities for error. Here are some of the more common mistakes you want to avoid:
- Forgetting to crack open the cylinder before attaching the regulator
- Failing to notice a missing or damaged O-ring
- Over-tightening the T-handle
- Forgetting to check for leaks
- Turning on oxygen before connecting tubing
- Failing to check the cylinder pressure and unexpectedly running out of oxygen
Following the routine presented in this post the same way every time may prevent many of these mistakes.
Getting oxygen out of a tank requires preparing and using lifesaving equipment safely, correctly, and efficiently. A well-practiced routine helps you confirm that the regulator fits properly, the O-ring is in place, and the cylinder contains enough oxygen before an emergency occurs. This preparation reduces errors, protects your equipment, and ensures oxygen is ready when your patient needs it.
If you’d like to learn more about oxygen administration in urban or wilderness settings, or if leading a backcountry expedition is on your bucket list and you’d like the peace of mind of having wilderness medical training or EMT training as part of your skillset, consider taking one of our courses:
- 21-Day In-person EMT Course
- Hybrid EMT Course (Online & In-person in Oregon, Idaho, or North Carolina)
- Self-Paced EMT Course (Online and In-person in Oregon and North Carolina)
- Wilderness EMT Course
- Wilderness First Responder (WFR) Course (North Carolina and Oregon)
- Wilderness First Aid (WFA) Course (Oregon and North Carolina)
Learn from some of the best wilderness medicine and EMS instructors in the industry. Our certified instructors provide professional instruction and individualized training to help you build the foundational skills needed to pass the National Registry of Emergency Medical Technicians exam, become an EMT, or just be the best version of yourself when leading groups on expeditions and weekend trips in the backcountry.
– – – – – – – – –
About The Author: David Young, EMT, is the Director of Emergency Medicine Education at The National Center for Outdoor & Adventure Education (NCOAE) in Wilmington, North Carolina.
Disclaimer: The information in this National Center for Outdoor & Adventure Education (NCOAE) blog post about administering oxygen in urban and backcountry settings is provided for general informational purposes only and may not reflect current risk management or medical thinking or practices. No information contained in this post should be construed as risk management or medical advice from the staff at NCOAE. No reader of this post should act or refrain from acting on the basis of any information included in, or accessible through this post without seeking the appropriate medical advice on the particular facts and circumstances at issue from a licensed medical professional in the reader’s state, country or other appropriate licensing jurisdiction.
TALK TO US
Have any further questions about our courses, what you’ll learn, or what else to expect? Contact us, we’re here to help!
Leave a comment